After gaining physical access to a client location on a recent red team engagement, I found a BitLocker-encrypted laptop along with a PIN and domain credentials necessary to boot Windows and login. While I wanted to leave the laptop in place on site to provide us with a backdoor into the network, I also wanted to clone its hard drive so I could examine the installed software more closely off site. Because BitLocker leveraged the laptop’s TPM (Trusted Platform Module) for decryption, simply knowing the PIN was not enough to clone the encrypted drive and decrypt it on another system. And since the client used Group Policy to disable access to the BitLocker management tools on the laptop, I couldn’t immediately retrieve the drive’s recovery key without first bypassing the policies they had in place.
The steps below explain the procedure I used to remove the applied policies, create a decrypted copy of the hard drive, and then return the drive to its original state without triggering any alerts from endpoint detection or other defensive measures. Admittedly, this is a relatively simple, low-tech attack that requires local administrator access to work.
Prerequisites
To perform this attack, you need to be able to boot into the Windows operating system on the target device and then access the system as a user with local administrator rights. You’ll also need an external hard drive that has at least enough free space to store the entire contents of the hard drive in the target computer. A hard drive two to three times as large as the target computer’s hard drive is ideal since this will allow you to store both encrypted and unencrypted images of the target computer’s hard drive. Lastly, you’ll need a live Linux bootable media. I’m using a USB flash drive imaged with a Kali Linux ISO in the example below.
Step 1: Create a backup image of the encrypted hard drive
To begin, make sure the computer is completely powered off. You might also consider unplugging it from the network if it is plugged in to a physical network connection. Then boot the computer from your live Linux boot media.
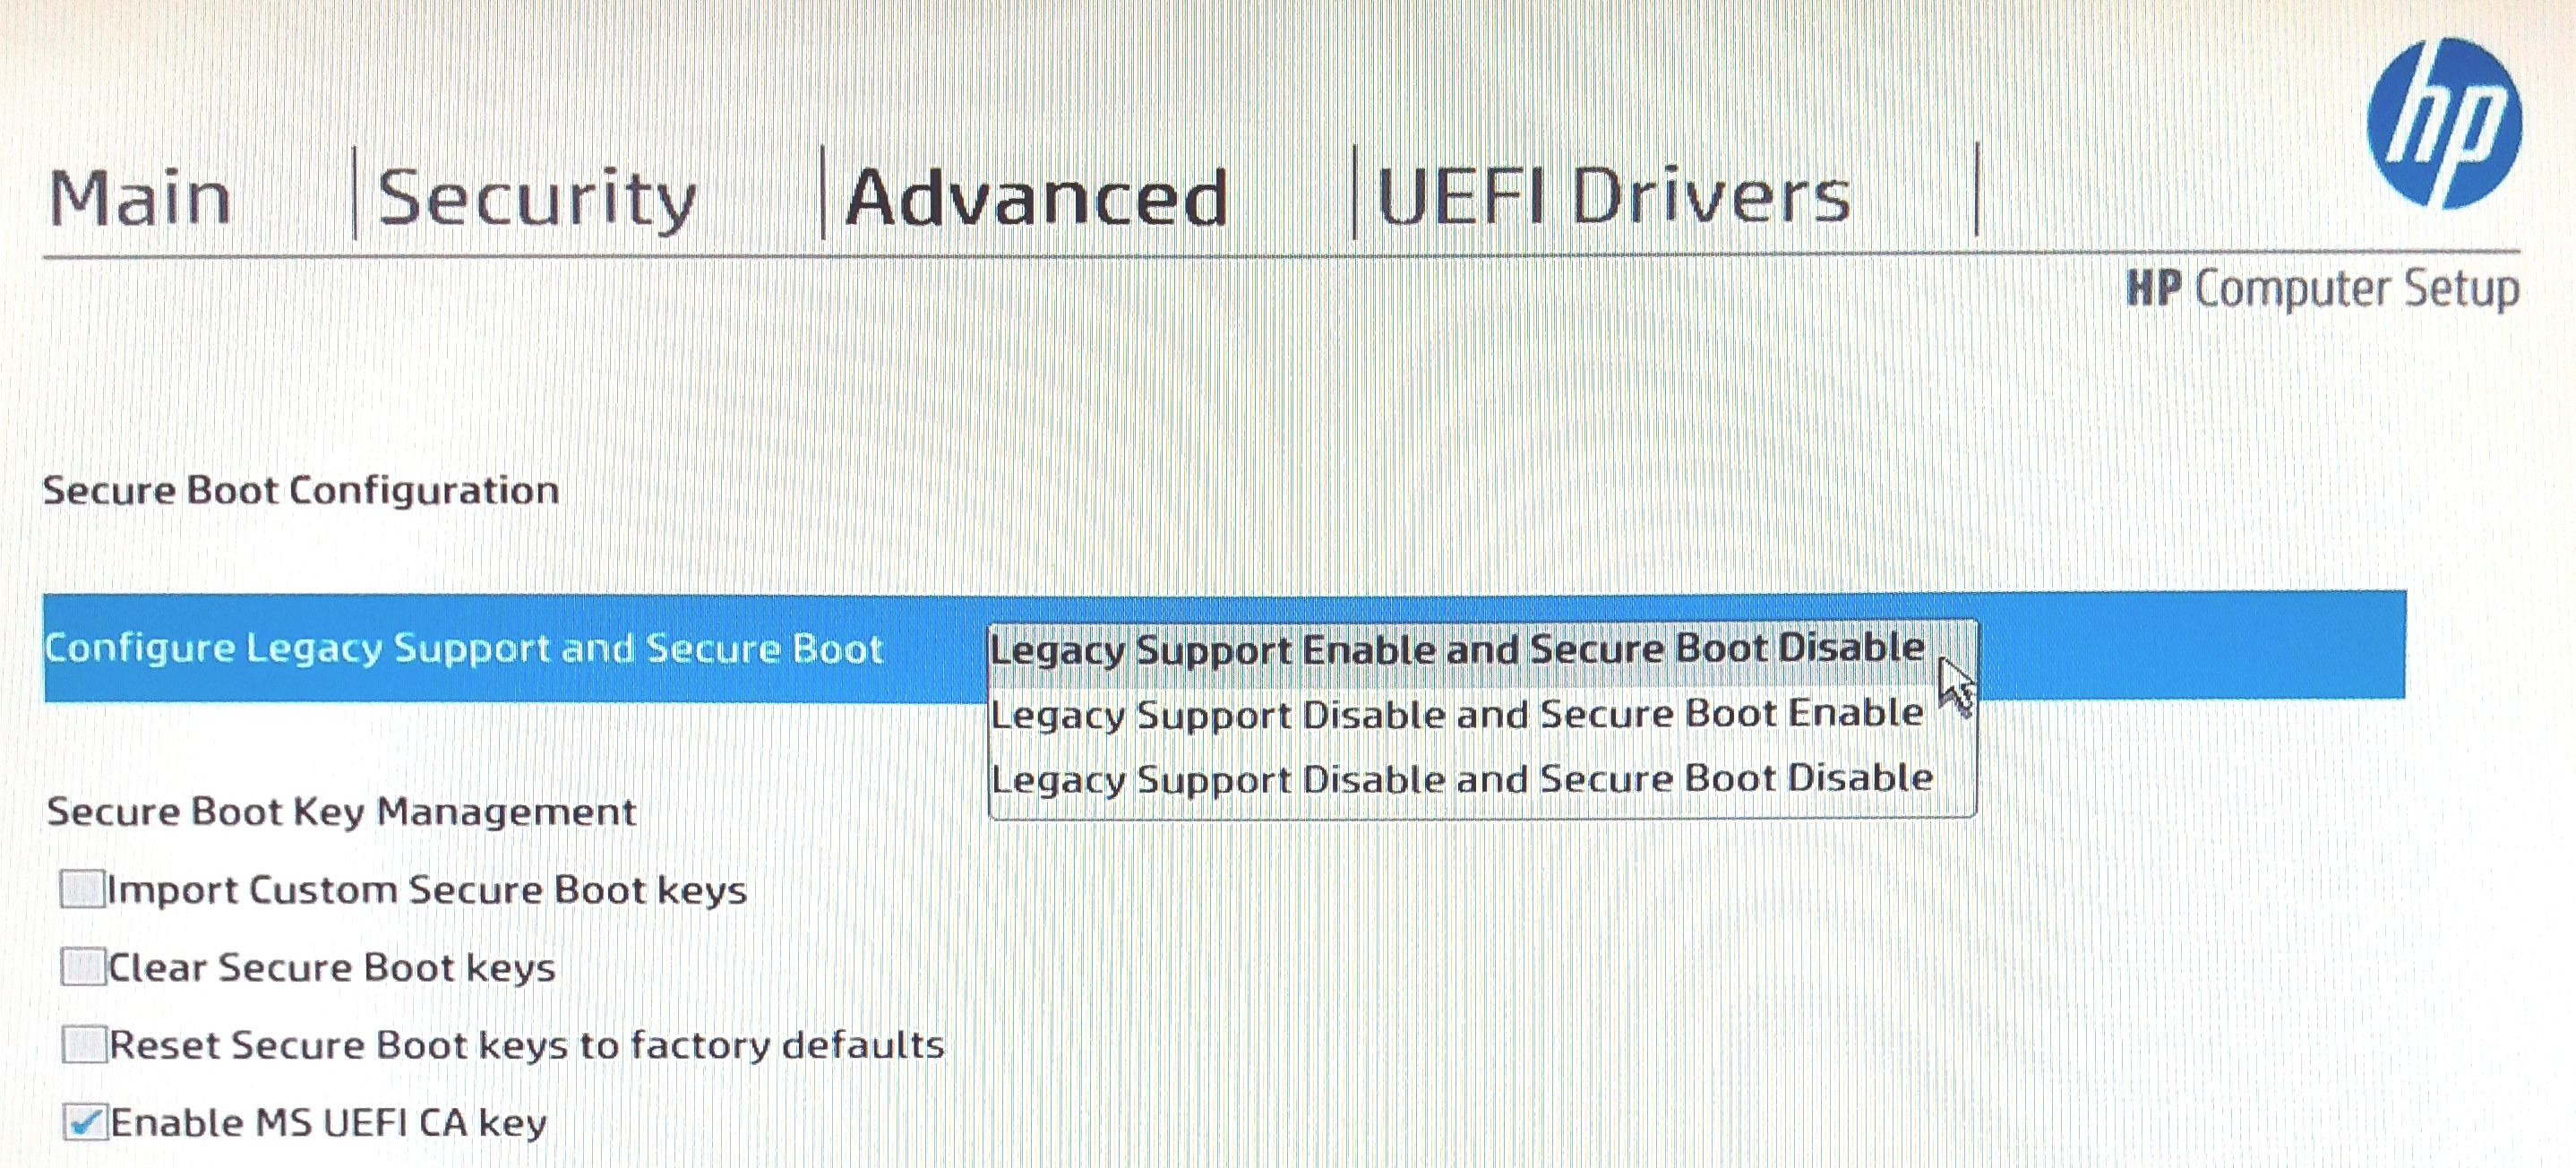
If the target computer uses Secure Boot and the removeable media you’re using doesn’t support it then you may need to change the computer’s BIOS settings to allow legacy boot modes. If so, remember to make a note of the original settings so you can put them back like they were when you’re done.
Here’s a screenshot of me changing this setting on my target device:
After booting into your live Linux system, open a terminal as the root user. Use lsblk or fdisk to determine which device is the encrypted hard drive of the target and which is the live Linux media you booted from. In this example, /dev/nvme0n1 is the target hard drive and /dev/sda is my Kali Linux USB. Depending on the hardware used, the target hard drive on your system may begin with /dev/sd or /dev/hd instead of /dev/nvme. Use the disk sizes to determine which is the most likely device.
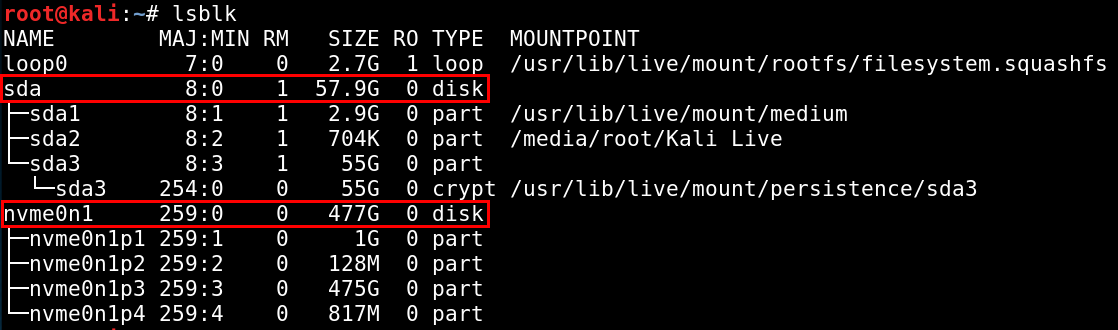
Now that you’ve identified the target’s encrypted hard drive, attach the external hard drive where you’ll save the backup image. After plugging in the external drive, running lsblk or fdisk again will show the new device.
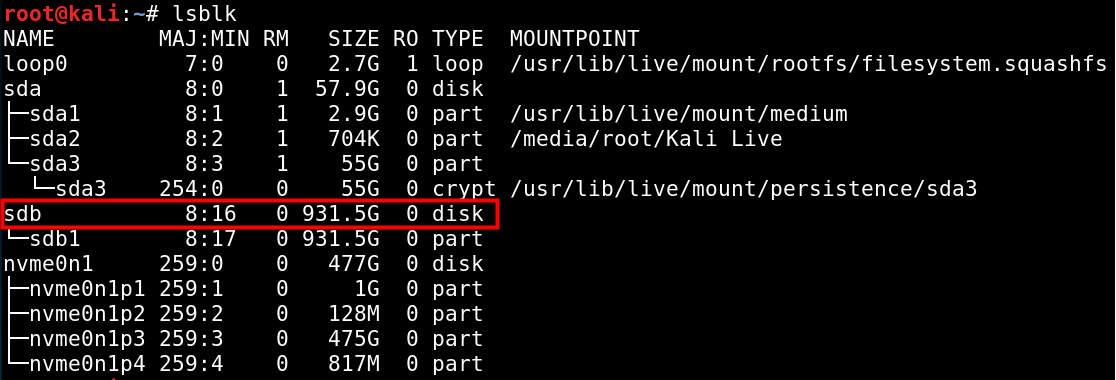
To recap, in this example we’ve established that the target computer’s encrypted hard drive is /dev/nvme0n1 and the external hard drive where I’ll save the backup image is /dev/sdb. I’ll now mount the /dev/sdb1 partition and use dd to create a one-to-one backup image of the encrypted drive.
root@kali:~# mount /dev/sdb1 /mnt
root@kali:~# dd if=/dev/nvme0n1 of=/mnt/encrypted-hdd-backup.img bs=10M status=progress
This part may take some time to finish. Make sure to disable automatic suspend or hibernation in your live Linux OS while this runs if you haven’t already. The screenshot below shows the output from the dd command run on my system.

Once the command completes, you can shutdown the system using the poweroff command.
Step 2: Disconnect the target computer from all network connections
Now that you’ve created a backup image of the encrypted disk, you can safely make changes to it that you can undo later. The first change you’ll want to make is to completely prevent the target computer from talking back to the blue team to alert them that its being tampered with. If you haven’t already, unplug it from any physical network cables. After that, you need to disable the wireless network adapter if the computer has one. I recommend doing as many of the following as possible, just to be safe:
- Turn off the wireless adapter’s hardware switch. Soft switches may or may not be reliable, and the adapter could get turned back on during boot, after a reboot, or at other times if it’s a soft switch.
- Disable the wireless adapter in the computer’s BIOS settings.
- Disable the wireless adapter in Windows.
Once you’ve done 1 and 2 above, you can boot back into Windows to do number 3. If you disabled Secure Boot to enable booting from your Linux media, you’ll most likely need to return the setting to its original configuration now to boot back into Windows. On the first boot after re-enabling Safe Mode, you might be prompted to enter your BitLocker recovery key as in the screenshot below.
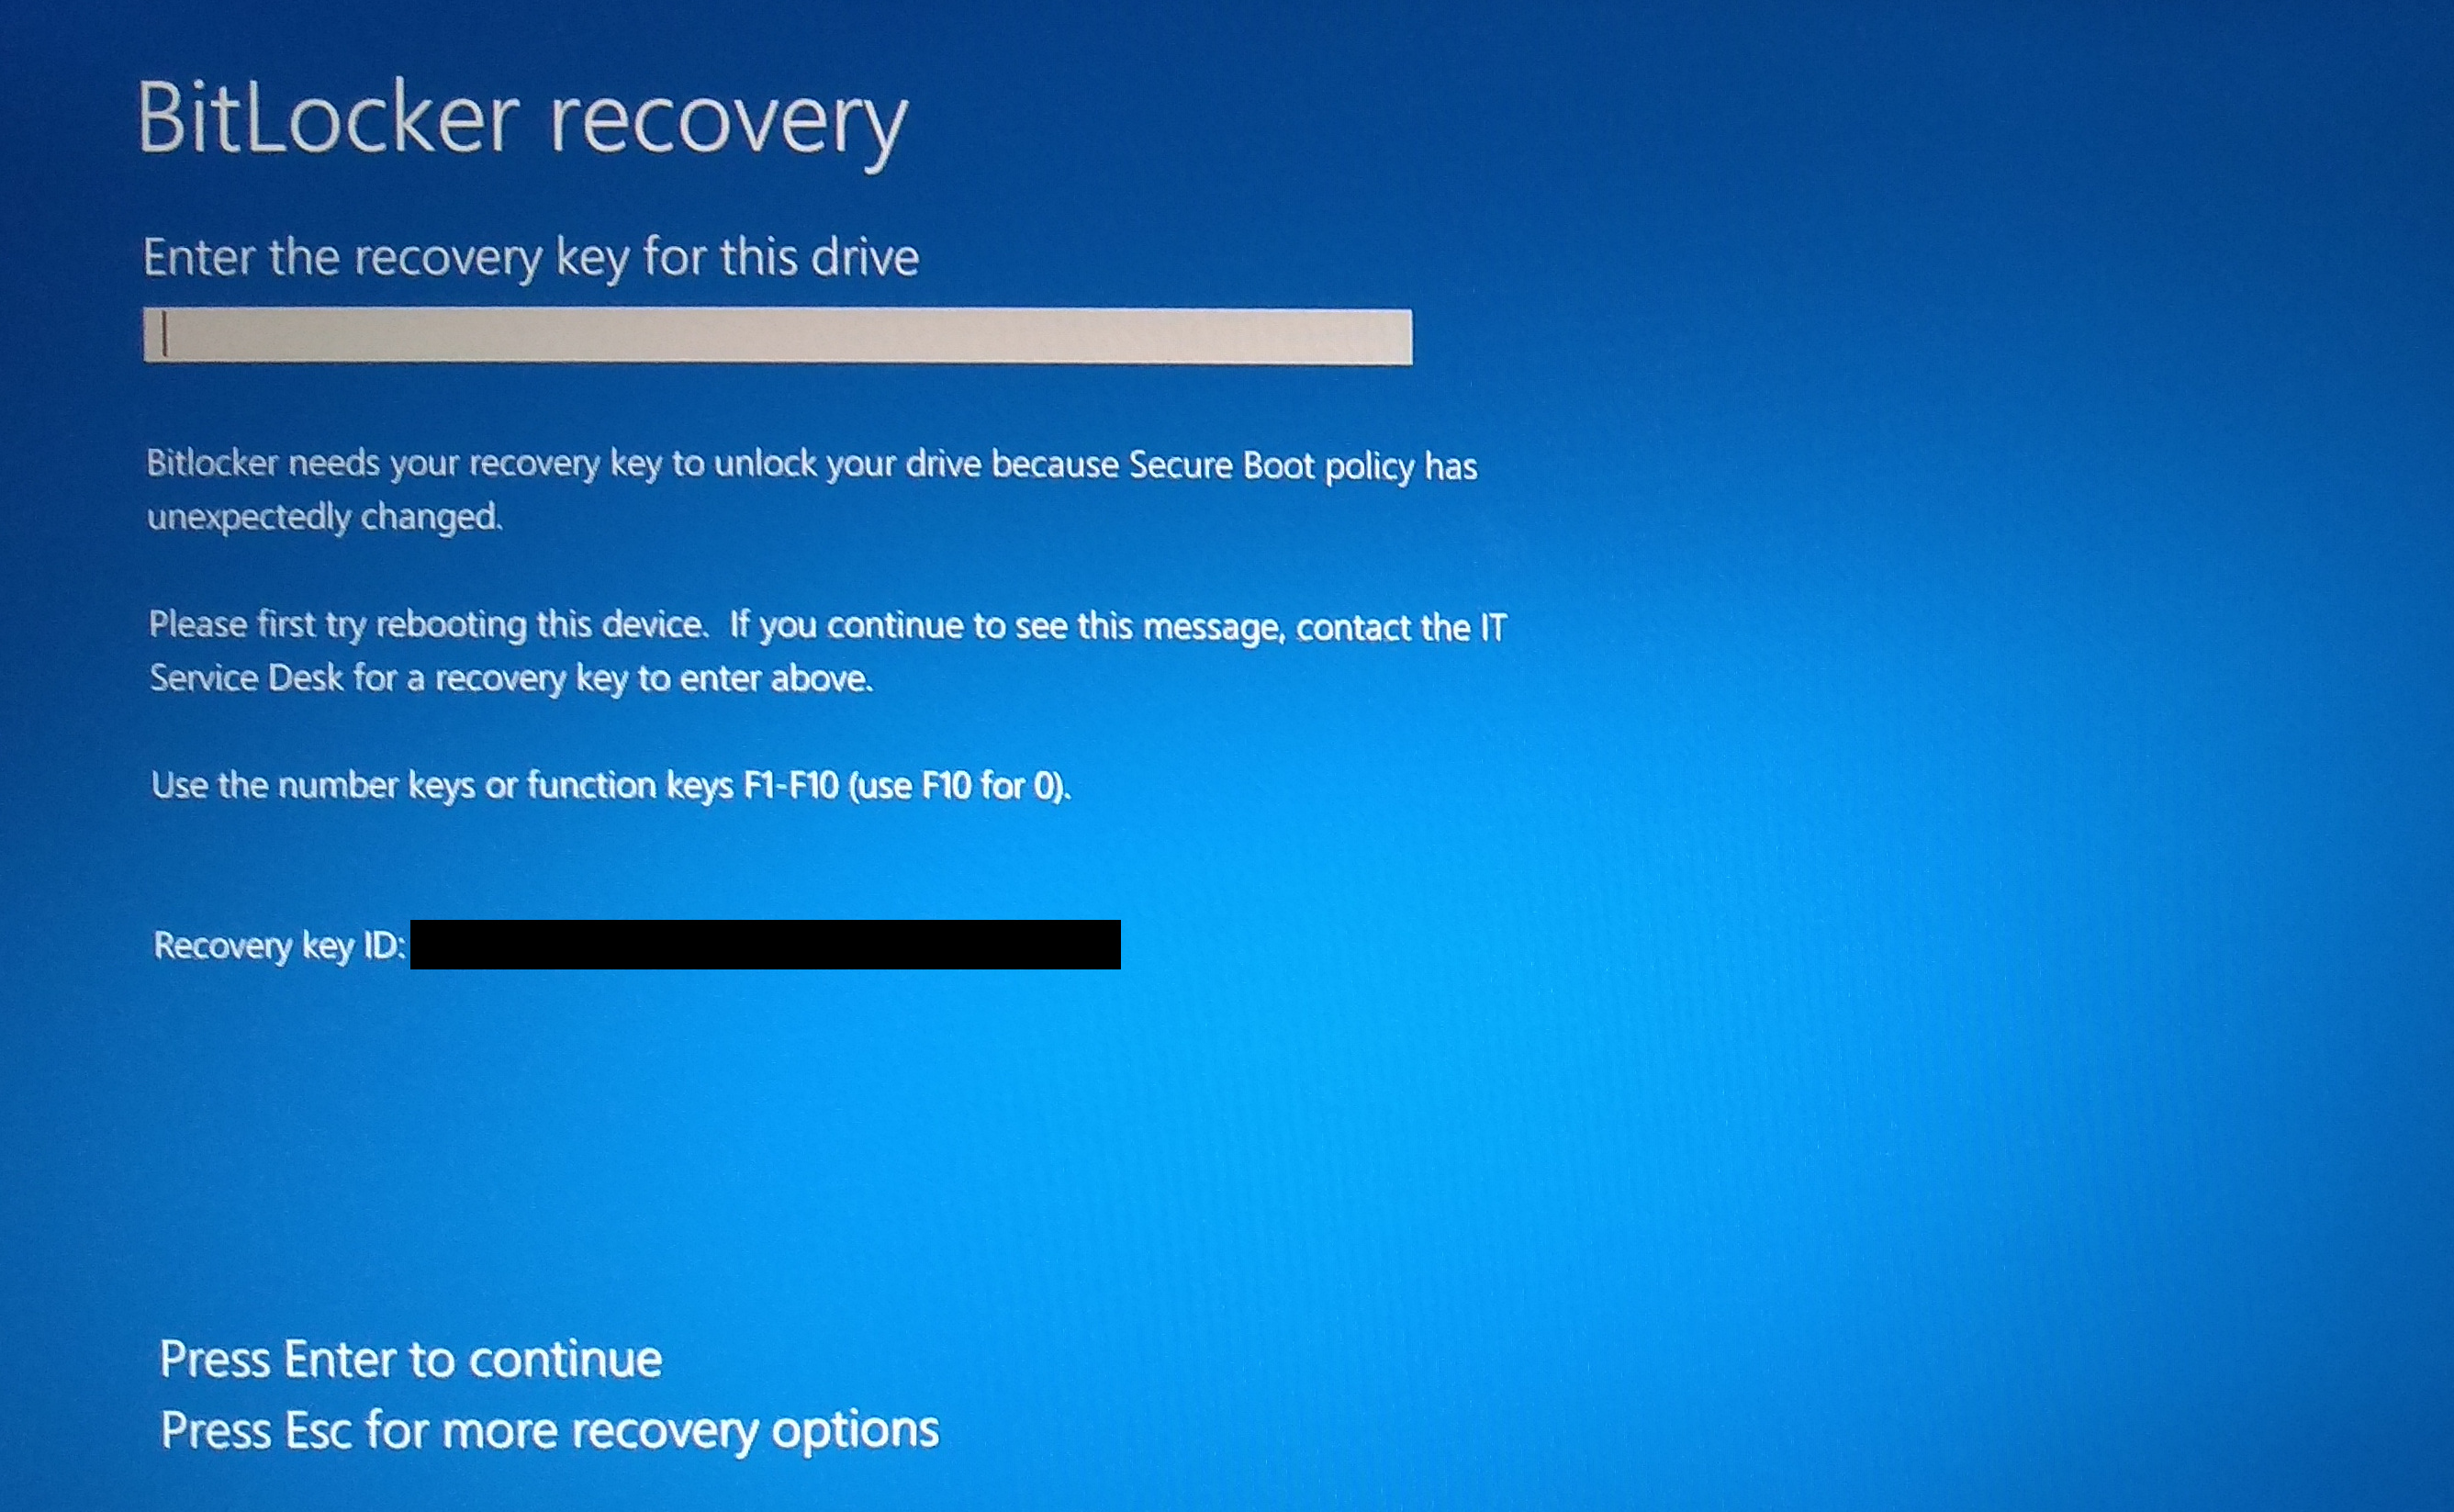
If this happens, force a hard power off by holding down the power button on the computer until it shuts off. Then boot up again, and the boot process should continue as normal. (If it doesn’t continue as normal, double-check that all the BIOS settings have been returned to their original values and then try rebooting again.)
Once you’ve completely disconnected from the physical network and disabled any wireless network adapters, login to Windows as a user with local administrator rights. If you’ve done everything correctly up to this point, everything you do from here on should be undetectable by the blue team since:
- The computer has no network connections that can be used to talk to anyone.
- You can revert to the backup image before connecting the computer back to the network, eliminating any stored alerts generated by your actions in between.
Step 3: Disable group policy
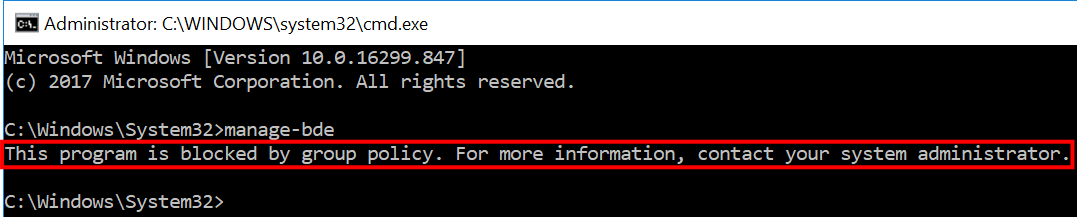
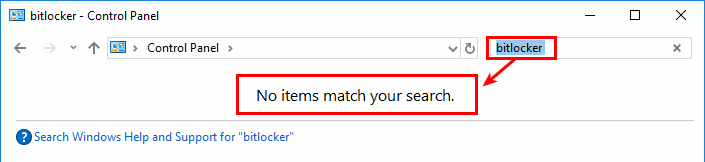
After you login to Windows, you can confirm whether Group Policy is blocking access to the BitLocker management tools by running manage-bde at a command prompt and by searching for “bitlocker” in the Control Panel. If Group Policy is blocking access, you’ll see a message to that effect when you run manage-bde, and you won’t see any results when you search for BitLocker in the Control Panel. If either of those attempts are successful, however, one or more Group Policy protections are not in place, and you can most likely skip this step.
Running the following commands from an elevated command prompt will delete the registry keys created by BitLocker-related Group Policy settings. If desired, you can backup the original values before deleting the keys as well.
Optionally backup the registry keys that are about to be deleted:
reg export HKCU\Software\Microsoft\Windows\CurrentVersion\Policies\Explorer\DisallowCpl reg-backup-1.reg

reg export HKLM\Software\Policies\Microsoft\Windows\SRPV2 reg-backup-2.reg

reg export HKLM\SOFTWARE\WOW6432Node\Policies\Microsoft\Windows\SrpV2 reg-backup-3.reg

reg export HKLM\System\CurrentControlSet\Control\SRP\GP reg-backup-4.reg
Delete the registry keys:
reg delete HKCU\Software\Microsoft\Windows\CurrentVersion\Policies\Explorer\DisallowCpl /f

reg delete HKLM\Software\Policies\Microsoft\Windows\SRPV2 /f

reg delete HKLM\SOFTWARE\WOW6432Node\Policies\Microsoft\Windows\SrpV2 /f

reg delete HKLM\System\CurrentControlSet\Control\SRP\GP /f
Now you need to reboot the computer for the changes to take effect. Remember to keep it disconnected from the network so the old Group Policy settings can’t be reapplied when the computer starts back up.
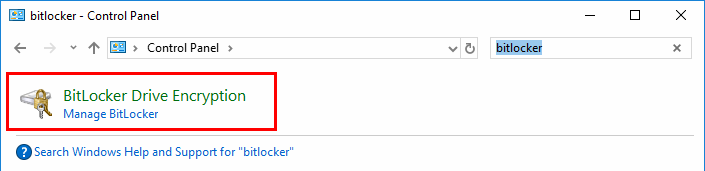
When you log back in, use the same user account you used to run the reg commands above - that way the HKCU (HKey_Current_User) registry changes will still apply. This time when you search the Control Panel for “bitlocker”, you should see BitLocker Drive Encryption in the results.
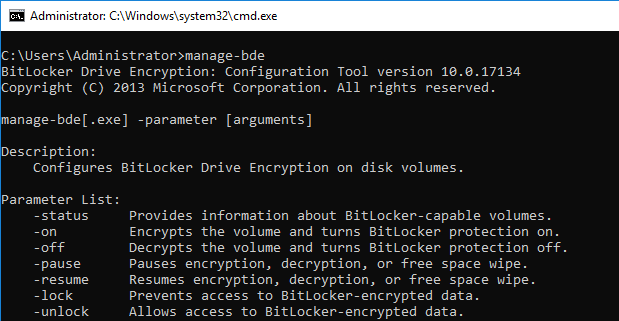
You should also now be able to execute manage-bde successfully from a command prompt.
It is always possible that endpoint protection or other software blocks access to one or both of these tools as well. If you can get access to one but not the other, no big deal - they can both be used to decrypt the drive.
Optional Step 4: Retrieve the BitLocker Recovery Key
Like the heading says, this step is optional. All the BitLocker installations I have seen that are configured to use the system’s TPM have had a recovery key that can be used to decrypt the drive without access to the TPM. This key allows you to mount the hard drive (or the encrypted image you created in Step 1) offline or to boot it on different hardware among other things.
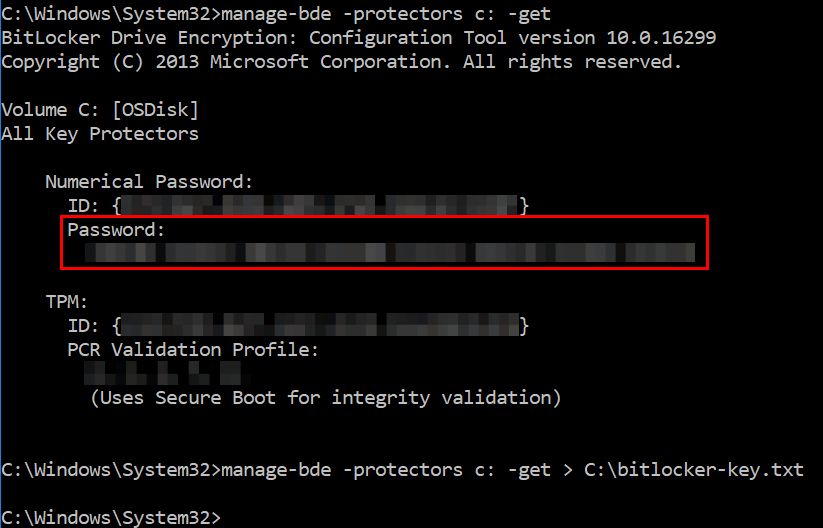
Run the following commands in an elevated command prompt to retrieve the recovery key. The first command will display the key on screen, and the second command saves it to a text file.
manage-bde -protectors c: -get

manage-bde -protectors c: -get > recovery-key.txt
Here’s an example of what the output from both commands looked like on my machine. Although I’ve obfuscated the recovery key and other potentially identifying information in this example, the “Password” section is where the recovery key is displayed.
Step 5: Decrypt the hard drive
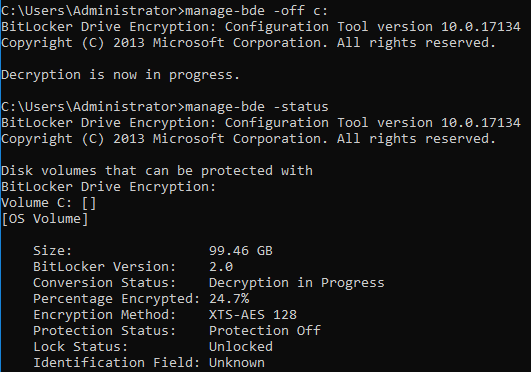
To decrypt the hard drive, you can use either the manage-bde command or the BitLocker Drive Encryption tools in the control panel. The first command below will begin the decryption process, and the second command will show its progress.
manage-bde -off c:

manage-bde -status
Here’s a screenshot of these commands in action:
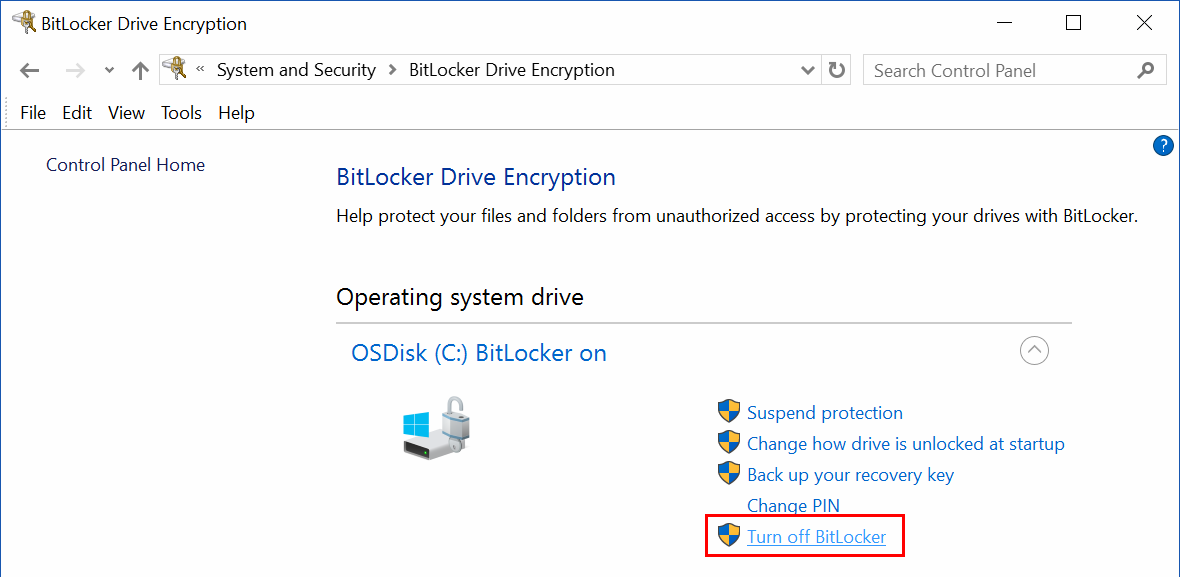
To use the BitLocker Drive Encryption tools in the Control Panel instead of using the manage-bde command, just click the “Turn off BitLocker” option next to the drive you want to decrypt. You’ll be prompted to confirm that you want to turn off BitLocker, and then the process will begin.
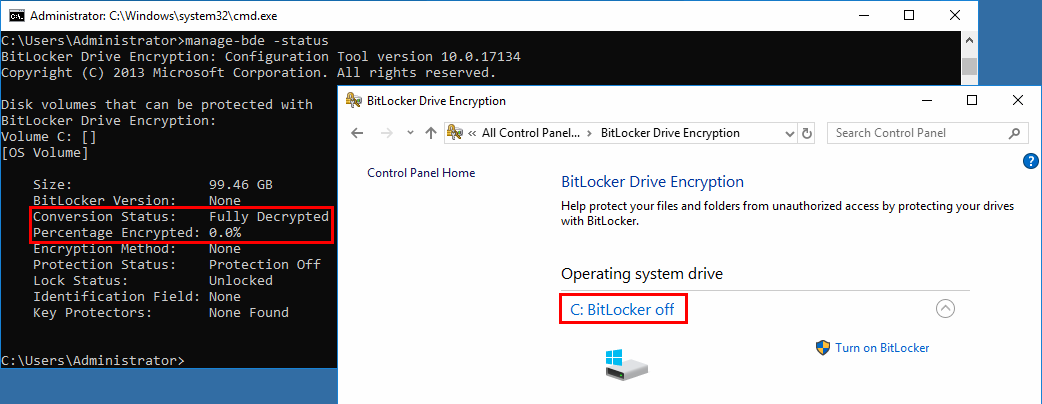
Once the decryption process is complete, it will be reflected in the output of the status command or in the BitLocker Drive Encryption GUI. Examples of each are shown below.
Now you can access the drive as you would any decrypted drive. You can also repeat Step 1 if you want to create an image of the unencrypted drive that you can use for other purposes.
Step 6: Returning the drive to its original state
When you’re done accessing the drive in its decrypted state, you can return it to its original state and remove all traces of your actions by writing the original, encrypted image back to the hard drive. To do this, you’ll boot from your live Linux media again and repeat the process outlined in Step 1 until you get to the dd command. To restore the orignal image back to the disk, you’ll swap the input file and output file arguments in the command from Step 1 like so:
dd if=/mnt/encrypted-hdd-backup.img of=/dev/nvme0n1 bs=10M status=progress
Remember to replace /dev/nvme0n1 with the location of the target disk on your system. Once execution of this command completes, you can poweroff the live Linux system, restore the target computer’s original BIOS settings, and boot back into Windows as though nothing ever happened.